Showing posts with label Holiday. Show all posts
Showing posts with label Holiday. Show all posts
Monday, March 25, 2013
Friday, November 30, 2012
Chevron, Dots and Stripes Ornaments
Looking for project to do in a rainy/snowy day? How about sprucing up your old ornaments? We have these plain silver ornaments and added some patterns using glitter powders. Dots, chevron, stripes in candy colors. Just paint your pattern using glitter glue and sprinkle the powder on top of it. For a close up look, click on the image.


Wednesday, November 28, 2012
Holiday Gift Guide
Just in time for the holiday, check out this ultimate guide curated from amazing bloggers and tastemakers!


Tuesday, November 27, 2012
Mark your calendar - Dec 1
Neiman Marcus and Target have joined partnership in bringing an affordable collection from 24 top designers for this holiday season. All of these fabulous items will be offered at limited time at both NM and Target stores starting December 1. Too see what they are offering, please click here.


Monday, November 26, 2012

Thursday, November 15, 2012
Featured Artist: Kim Seybert
Getting ready for Holiday entertaining? Kim Seybert has the most gorgeous tabletop accessories. I personally love her napkin rings. They are like jewelry. So glamorous! You can check out her Fall collection here.


Friday, November 9, 2012
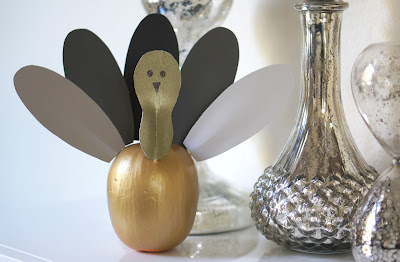
Mila's Turkey Pumpkin
If you still have uncarved pumpkins from Halloween, this turkey pumpkin is a fun and easy project for kids of all ages to make. You can also use it as a decoration for your Thanksgiving's table! Even though Mila is only 2, she picked out all the color swatches herself. I helped her cutting them and she glued both sides together and put the skewers in. She's so happy and proud when we are done.
 Materials:
- Pumpkins
- Paint samples/swatches
- Skewers
- Glue
- Paint
1. Instead of purchasing card stock, why not use some paint samples from your local hardware stores. We went to Home Depot and used Martha Stewart's paint swatches since they are a good size and the colors are great for the Fall! You need a total of 12 swatches for each pumpkins. 10 for the feathers and 2 for the head. Mila decided to do a rainbow one, so she picked out 12 different colors.
 2. Draw a feather shape on the back of the sample and cut it out. Trace your cut to make the other 9. To save time, cut them back to back. Then draw a simple bowling pin shape for the head. Add simple two circles for the eyes and a triangle for the nose. Cut them back to back as well. Glue the two sides together. Make sure to leave an opening at the bottom for the skewers. I put them under a heavy book until the glue dries.
 3. While waiting for the glue to dry, we decided to paint the pumpkins to make the feather's colors pop. Mila painted hers white, and I painted mine gold. I used a left over Martha Stewart's Tiger Eye paint from the Birch wall project.
 4. Trim your skewers shorter and insert them in between the opening of the feathers and head.
 5. Insert all pieces into your pumpkin and meet your turkey!


- Pumpkins
- Paint samples/swatches
- Skewers
- Glue
- Paint
1. Instead of purchasing card stock, why not use some paint samples from your local hardware stores. We went to Home Depot and used Martha Stewart's paint swatches since they are a good size and the colors are great for the Fall! You need a total of 12 swatches for each pumpkins. 10 for the feathers and 2 for the head. Mila decided to do a rainbow one, so she picked out 12 different colors.


Friday, November 2, 2012
Recycling pumpkins for Thanksgiving
Now that Halloween is over, what can you do with all of those pumpkins? Well, don't throw them out just yet, you can reuse them for Thanksgiving! And here are some DIY ideas on how to turn them into decorations, centerpieces or placecard holders.
As candleholders...
 As centerpieces...
 As vases...

 As placecard holders...

 To see the resources and instructions, please visit my pinterest.
As candleholders...


Wednesday, October 31, 2012

Saturday, October 13, 2012
Mila's Decorated Pumpkins
We spent our Saturday morning decorating pumpkins. Mila put some glitters and painted the bottom of the pumpkins {with my partial help}. I used the left over nailheads from my bench to create her initial and glued the spider she got from her school. We love how they turned out!
 For more inspirations, visit my Halloween board at Pinterest

Sunday, December 18, 2011
Christmas Decorating: Modern Gold and Silver
Since we will be away for Christmas and New Year, we are not planning to decorate this year. But if we are, I have "Gold and Silver" in mind.

Mila has been saying "Santa" to all Christmas related items, from the actual Santa to Christmas trees. So I drove to the closest Christmas tree lot on Friday and looked for the smallest Christmas tree they have. And this is what we ended up with {just slightly taller than her}
 Happy Holidays and see you next year!
From clockwise: Bottle Brush Tree Set, Confetti Plate, Tinsel Plate, Perforated Metallic Tealight Holder, Luster Onion Glass ornaments, Marimekko gift wrap, Farris Pillow, Gold and Silver Chocolate Cake Pops

Mila has been saying "Santa" to all Christmas related items, from the actual Santa to Christmas trees. So I drove to the closest Christmas tree lot on Friday and looked for the smallest Christmas tree they have. And this is what we ended up with {just slightly taller than her}

From clockwise: Bottle Brush Tree Set, Confetti Plate, Tinsel Plate, Perforated Metallic Tealight Holder, Luster Onion Glass ornaments, Marimekko gift wrap, Farris Pillow, Gold and Silver Chocolate Cake Pops
Monday, October 31, 2011

Subscribe to:
Posts (Atom)